
You know those fancy case studies where someone built a beautiful, award-winning training program with unlimited budget and six months of development time?
Well, this isn’t that story.
Here’s what nobody tells you when you start in L&D as an instructional designer: it will seem that you spend 80% of your time making something out of nothing. Your stakeholder wants a full training program by next Tuesday. Your budget is smaller than a coffee shop gift card. And that fancy authoring tool everyone talks about? Yeah, your company doesn’t have it.
Welcome to scrappy L&D.
Let’s level set for a moment. Being scrappy isn’t about being cheap – it’s about being strategic. It’s the difference between saying “we can’t do that” and “here’s what we can do with what we have.” And right now, with instructional design jobs growing at 12% annually (US Bureau of Statistics), more of you are finding yourselves in these exact situations.
And to be honest, some of the best training content I’ve seen came from people who had to MacGyver their way through projects with duct tape and determination.
The Scrappy Mindset Shift
The hardest part of being scrappy isn’t the tools or the tight deadlines – it’s giving yourself permission to work differently. So let’s talk about the mental game of experimentation.
Stop waiting for permission to experiment. I’m serious. You don’t need approval to try something new. Just try it with a few people to see how the idea lands and apologize later if anyone cares (spoiler: they usually don’t).
Think like someone building with LEGO blocks, not creating a work of art. You’re assembling pieces that can be rearranged and reused, not creating one-off masterpieces. Reusable components, templates and content libraries save massive time. That great graphic you made last month? Template it. That assessment structure that worked? Copy it. That video intro? Use it again.
Build once, use forever. Or at least until the branding changes…again… 😆
The Real Talk on Tools
You know what’s exhausting? Tool comparison. Everyone’s shouting about the “best” platform while you’re just trying to figure out what you can actually use today and be productive and practical.
Here’s my advice. To be scrappy, start with what you’ve got. PowerPoint isn’t sexy, but it’s probably already on your computer, and it can do some pretty amazing things in the right hands. Then there are tools like iSpring Suite that can work directly with PowerPoint and are a low-cost entry point for creating micro courses. Canva has a free plan for design and graphics. So does Lumen5 for quick “how-to” videos. So there ya go. Four scrappy tools to build the base of your workflow.
The point is – being scrappy isn’t about having every tool. It’s about knowing which workflows and tool options can get you 85% of the way there.
Three Scrappy Workflows That Actually Work
Alright, time to get practical. Here’s how being scrappy actually works when you’ve got a deadline breathing down your neck.
The “I Have 48 Hours” Video Workflow:
- Script it out in Google Docs (free collaboration, no version control or email nightmares)
- Record with Loom (seriously, just click record, it’s that easy) or use Loom on your phone if you want that authentic feel
- Loom auto-generates captions. If you’re using something else, add captions with Descript or VEED (being sure to check for errors)
- For editing beyond basic trimming, try Camtasia (one-time fee), Descript or ScreenFlow if you’re on Mac
- Host on your LMS, share the Loom link directly, or use Vimeo’s free tier to host your video
This video isn’t going to win any awards but it’s going to get your learners what they need, when they need it. That’s a win in my book.
The “Turn a Document into Something Useful” Workflow:
- Start with the PDF or Word doc you already have
- Pull out the key concepts (ask AI to help you identify key points)
- Use Canva to create slides/graphics/handouts about those concepts
- Convert to an ebook format with tools like FlippingBook or SmallPDF (which has a free plan)
- Add a quick knowledge check or sign-off form using Google/Microsoft Forms or SurveyMonkey’s drag-and-drop interface
You just turned a 40-page compliance document into something people might actually engage with. You go!
The “Rapid eLearning” Workflow:
Real talk for a minute: Rapid eLearning is perfect for ‘here’s how to do the thing’ training. Processes, product knowledge, compliance, that kind of stuff. But if you need to actually change how people behave? You can’t shortcut that. Behavior change takes time, reinforcement, and a strategy that goes way beyond one course. Okay, now that I got THAT off my chest…
- Use PowerPoint for your base content (you know it, your SMEs know it)
- Add visual interest with Genially. It’s free, makes everything interactive, and you can learn it in about 20 minutes
- Generate branching scenarios with Twine. Make it interesting, tell a story!
- Add audio interest with Audacity (free editing and recording) or Audiate to level up audio (voices sound like BUTTER)
- For quick quizzes, use Kahoot or Google Forms
- Ready to load it into something? Try Iseasy or iSpring as an inexpensive alternative to Articulate
AI Tools to support the workflow
Time for the inevitable discussion about AI.
I’m not here to tell you AI is going to steal your job. But I am going to tell you that ignoring it while everyone else figures it out is a bad strategy. The instructional designers thriving right now are the ones who know how to work smarter with the tools they have, including AI.
A recent State of AI and Instructional Design Report surveyed instructional designers and found the overwhelming majority are already using AI to design and create learning content, including drafting video scripts, creating multimedia, and making quizzes. You’re behind if you’re not at least experimenting.
Where AI actually saves you time:
- First drafts and outlines: Stop staring at a blank page. Use ChatGPT or Claude to generate a course outline or the “crappy first draft” of content. It won’t be perfect, but it’s a hell of a lot easier to edit something than create from nothing. AI can create an entire course outline in minutes and generate quizzes instantly.
- Script writing: Tools like Synthesia can dramatically speed up video content creation by turning your scripts into training videos. You write what you want to say, AI helps you say it better (or at least tighter), then tools like Synthesia bring it to life. No more worries about camera shyness or bad lighting.
- Visual content: Need graphics, but your design budget is nonexistent? (I see you 👀) AI writing assistants and multimedia generators can help brainstorm new content and create some very cool graphics and video. Try Canva‘s AI features or tools like Leonardo for images. They’re not going to be perfect, but they’ll get you unstuck. And honestly, that’s half the battle.
- Quiz generation: Input your learning objectives into ChatGPT or Claude, and it will spit out multiple-choice, true/false, fill-in-the-blank, or matching questions. It takes 30 seconds, not 30 minutes. Quiz-Maker offers a handy AI quiz generator. Sure, you’ll need to review them because AI occasionally thinks it’s being clever when it’s just being confusing, but it beats staring at a blank quiz template.
- Translation and localization: AI-powered translation tools can translate entire course modules into multiple languages within minutes, making education more inclusive and accessible. If you need to deliver training globally, this is your shortcut.
Where AI will let you down:
There’s always a catch, isn’t there?
AI doesn’t get your learners. It’s never sat through a compliance training at 4pm on a Friday. It doesn’t know that your company uses “synergy” unironically or that Bob in accounting needs everything explained three times. It can’t tell when something sounds like “corporate word bingo” instead of actual guidance.
AI might automate quizzes or format slides, but here’s what it can’t do: make someone give a damn about your content. That’s still your job.
Use AI as your intern, not your replacement. It can handle the grunt work, but you’re the one who knows what good training actually looks like.
A scrappy AI workflow:
- Feed AI your messy notes and ask for a structured outline
- Review and edit for tone, accuracy, and relevance (this step is non-negotiable)
- Ask it to generate supporting materials like quiz questions, hand-outs or image ideas
- Edit, and edit some more
- Run everything through your own quality filter
- Test with one real person before you scale
The key word here is “assist.” AI can streamline common tasks, helping you to make better use of your time. But if your training sounds like it was written by a robot, your learners will tune out faster than you can say “synergize learner engagement.”
Budget-Friendly eLearning Tools Mentioned in this Post
Free tier tools that punch above their weight:
- ChatGPT or Claude: (your AI writing assistant for outlines, first drafts, and quiz questions)
- Leonardo/Nano Banana/Sora 2: AI Image Generators
- Loom: (video recording that’s literally just “click and talk”)
- Canva: (design anything, seriously – now with AI features built in)
- Genially: (make interactive content without a learning curve)
- Kahoot: (quizzes people actually want to take)
- Quiz-Maker: (Quick AI-generated quizzes)
- Google Forms: (quick assessments)
- Iseasy: Course generator (free to $217/month). Simple is as simple does.
- ScreenPal :(formerly Screencast-O-Matic, screen recording for when you need more control)
- Notion: (organize all your chaos)
- Descript: AI video editing, transcriptions, screen recorder (from FREE to $16/month)
- Audacity: Audio recording and editor
- Twine: Generate interactive, non-linear stories
Budget-friendly options worth the investment:
- iSpring Suite: ($970/year) if you live in PowerPoint and need to convert slides to SCORM-compliant courses
- ScreenFlow: for Mac users who need good screen recording
- Rise 360: (part of Articulate 360, starts at $1,499/year) for rapid responsive courses—though be aware there’s a bit more of a learning curve here
- All things TechSmith: Screen recording and capture, audio, video editing all the things! Prices vary by product.
- Synthesia: text to video, AI avatars (Free to $18/month)
- Lumen5: text to video, voice generator, script writing (from $19/month)
Remember: the goal isn’t to have every tool – it’s to know which ones get you to ‘done’ fastest.
Action plan for making it happen
Here’s your action plan for the next scrappy project that lands on your desk:
- Audit what you already have. What tools does your organization already pay for? What’s sitting in your personal toolkit? Start there before shopping.
- Template everything. Create four base templates: one for videos, one for slide decks, one for assessments and one for images. Customize from there instead of starting from scratch every time.
- Build a swipe file. Screenshot or bookmark examples of training content you like. When you’re stuck, steal the structure (not the content – you’re scrappy, not sketchy). Think of it as “inspiration.”
- Set a time limit. Give yourself three hours max to create a prototype. It forces you to focus on what matters and cut the fluff.
- Test with one person. Before you spend more time polishing, show it to one actual learner. Their feedback will tell you if you’re solving the right problem or just making something pretty.
Let’s Wrap This up!
Remember those fancy case studies we talked about at the beginning? The ones with unlimited budgets and six-month timelines? You don’t need that to create training that works.
You’ve got workflows. You’ve got tools. You’ve got permission to ship something good enough instead of waiting for perfect. That’s more than enough to get started.
Being scrappy isn’t about compromise. It’s about being smart with what you have. It’s about shipping training that helps people this week, not someday. And honestly? That’s the kind of L&D work that actually matters.
Now go make something cool. Your learners are waiting.
What’s your best scrappy win? Drop a comment or share your story below – we all learn from each other’s creative solutions.
Create Learning Experiences That Drive Real Business Impact
Register for the next free Learning Rebels Coffee Chat!
Ready to build learning experiences that drive business results? Start Now!

My go to free video editor is Shotcut (https://www.shotcut.org/). It’s easy to use and has lots of resources to help you figure out how to do what you need to do.
Good one! I haven’t tried it recently, but I hear good things. Thanks for sharing Betsy!
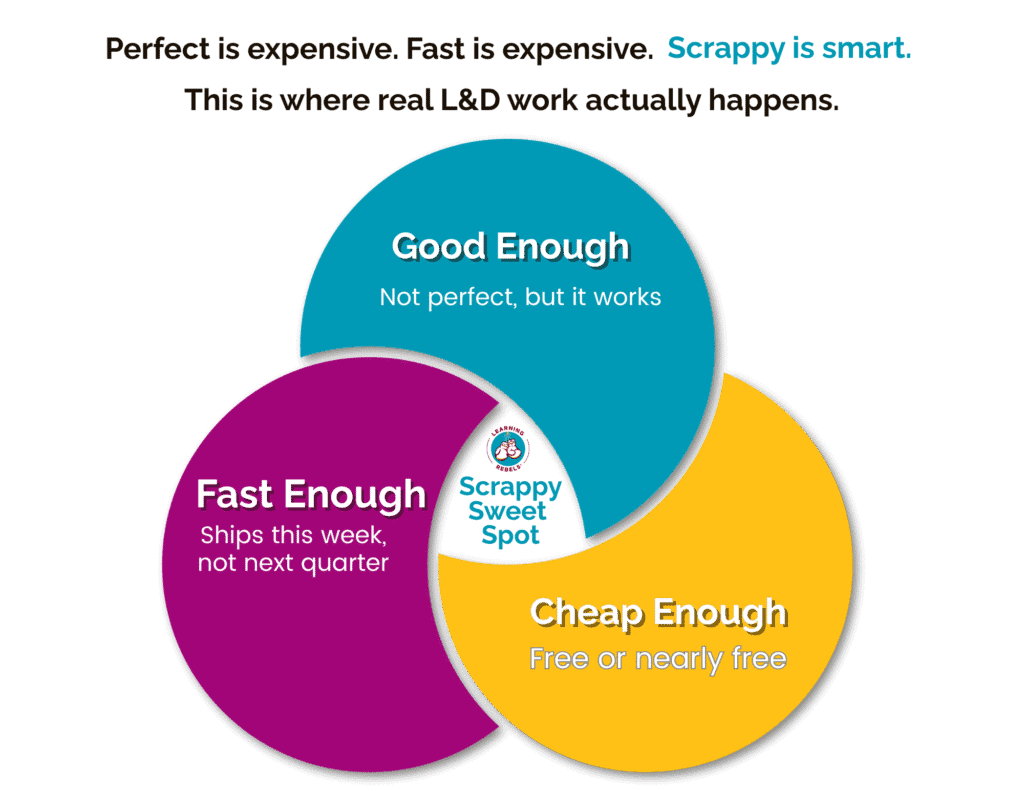
Thanks Shannon, I printed your Venn diagram and posted it on my door!
That’s fantastic Ramona! I’m so glad it resonated with you! Have a wonderful holiday. 😀
This scrappy instructional designer workflow guide gets straight to the point of turning limited resources into effective training, and if you’re looking for a curated hub of all those mentioned free or low-cost online tools plus maybe some hidden gems, a reliable free online tool directory could save you tons of time scouring the web separately.
free online tool mytoolhub
Thanks for sharing your go-to free video editor, Shotcut! It’s great to know there’s an easy-to-use option with plenty of resources, as mentioned in your guide. For more AI-powered video tools, you might find this interesting: https://nanabananapro.com/ai/video/seedance-2